安装MySQL
APT安装
安装mysql服务mysql-server
sudo apt install mysql-server #也可表示为mysql-server-x.x来指定版本,例如mysql-server-5.6初始化MySQL
sudo mysql_secure_installation首先便是要求设置root密码
Securing the MySQL server deployment.

Connecting to MySQL using a blank password.

VALIDATE PASSWORD PLUGIN can be used to test passwords
and improve security. It checks the strength of password
and allows the users to set only those passwords which are
secure enough. Would you like to setup VALIDATE PASSWORD plugin?

Press y|Y for Yes, any other key for No: n
Please set the password for root here.

New password:

Re-enter new password:
By default, a MySQL installation has an anonymous user,
allowing anyone to log into MySQL without having to have
a user account created for them. This is intended only for
testing, and to make the installation go a bit smoother.
You should remove them before moving into a production
environment.

Remove anonymous users? (Press y|Y for Yes, any other key for No) : y
Success.


Normally, root should only be allowed to connect from
'localhost'. This ensures that someone cannot guess at
the root password from the network.

Disallow root login remotely? (Press y|Y for Yes, any other key for No) : n

 ... skipping.
By default, MySQL comes with a database named 'test' that
anyone can access. This is also intended only for testing,
and should be removed before moving into a production
environment.


Remove test database and access to it? (Press y|Y for Yes, any other key for No) : n

 ... skipping.
Reloading the privilege tables will ensure that all changes
made so far will take effect immediately.

Reload privilege tables now? (Press y|Y for Yes, any other key for No) : y
Success.

All done!
可以依照上面的进行配置.
可能遇到的问题
Securing the MySQL server deployment.

Enter password for user root:
Error: Can't connect to local MySQL server through socket '/var/run/mysqld/mysqld.sock' (2)
解决方法:
sudo service mysql stop
sudo service mysql start
登录MySQL
sudo mysql -u root -p # 注意,需要加sudo设置远程访问
需要设置 mysql 数据库支持外部或者远程访问,则需要把绑定 IP 地址改为 0.0.0.0,或者不写IP地址。因此编辑配置文件:
sudo vim /etc/mysql/mysql.conf.d/mysqld.cnf修改绑定地址为 0.0.0.0。原来默认绑定 127.0.0.1 注释掉。
bind-address = 0.0.0.0
# bind-address = 127.0.0.1
然后登入MySQL
sudo mysql -u root -p
mysql> GRANT ALL PRIVILEGES ON *.* TO 'root'@'%' IDENTIFIED BY '您的数据库密码' WITH GRANT OPTION;
同时刷新权限
flush privileges;修改完 mysqld.cnf 文件有最好重新启动服务器。
systemctl restart mysql.service远程访问MySQL
sudo mysql -h 192.168.123.165 -u root -p -P 3306-h: 远程主机IP地址
-P: 远程端口
跳过密码直接登入MySQL
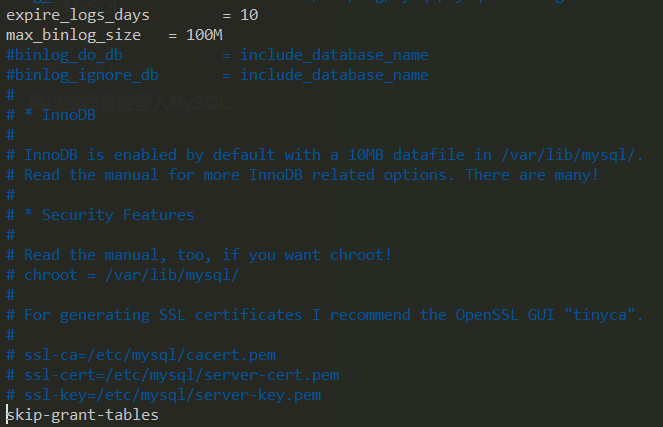
通过修改以下文件可以直接跳过密码登录MySQL
sudo vim /etc/mysql/mysql.conf.d/mysqld.cnf在文件最后行加上下面这句
skip-grant-tables
修改后保存并退出编辑。
然后去登录mysql,需要输入密码的时候直接敲回车。
其他问题
解决 MySQL 的 ERROR 1698 (28000): Access denied for user ‘root’@’localhost’
因为在最近的Ubuntu安装(当然也可能是其他安装)中,MySQL默认使用了UNIX auth_socket plugin插件。
简单来说这意味着当db_users使用数据库时,将会通过系统用户认证表进行认证。你可以通过下面的命令看看你的root用户是否设置成了这样:
$ sudo mysql -u root # I had to use "sudo" since is new installation

mysql> USE mysql;
mysql> SELECT User, Host, plugin FROM mysql.user;

+------------------+-----------------------+
| User             | plugin                |
+------------------+-----------------------+
| root             | auth_socket           |
| mysql.sys        | mysql_native_password |
| debian-sys-maint | mysql_native_password |
+------------------+-----------------------+
就像你在查询语句中看到的那样,root用户在使用auth_socket插件。:
1. 你可以设置你的root用户使用mysql_native_password插件
$ sudo mysql -u root # I had to use "sudo" since is new installation

mysql> USE mysql;
mysql> UPDATE user SET plugin='mysql_native_password' WHERE User='root';
mysql> FLUSH PRIVILEGES;
mysql> exit;

$ service mysql restart


